


Affiliate Disclosure As an Amazon Associate I earn from qualifying purchases. This post may contain affiliate links. For more details, refer to my Disclaimer page.
I take you from start to finish in my all need to know guide about baking bread. This post will focus purely on yeast based bread recipes. The basic ingredients of yeast, flour, water and salt have to ability to make so many different breads from all around the world so let me show you how it all comes together.
This is a post to cover the types of bread you can make from these basic bread ingredients along with an overview of the breadmaking flour types and their uses.
As this post focuses on yeast based breads, please refer to this non yeast and sourdough breads post for where to begin with those types. Throughout the post there will be links to other baking tools and recipes for you to try at home.
Contents
- Bread Ingredients - Flour, Water, Yeast & Salt
- Choosing flour to make bread
- Bread Recipes From Around The World
- Water For Bread Dough
- Yeast For Baking
- Mixing the ingredients
- Rising (Proving)
- Shaping
- Shaping and Proving - An Experiment
- Baking A Loaf Of Bread
- Checking Bread Is Cooked
- Storing Bread
- Toppings & Bread Dips
- Conclusion
- Your Comments

Bread Ingredients - Flour, Water, Yeast & Salt
These 4 ingredients are all you need to make a loaf of bread. This post will break down the various elements of the ingredients in detail to show how technical in the detail you can go if you want.
From days of old, there have always been methods to baking bread and today is no different. The artisan bread world may make you think there is more to it but really it is very simple and just comes down to these four things.
Choosing flour to make bread
Flour is a staple ingredient in a lot of recipes around the world. Depending what type of flour is used can have a huge impact on the texture, flavour, smell and overall bake of a bread or pastry. There are a variety of flour types of which I will cover the big 4 which I use across my recipes, these being: 00 flour, T55 flour, plain flour, self-raising flour, and bread flour. These each have a use and specific properties which allow them unique flavours when baking.
00 Flour (Pizza and Pasta)
Starting with 00 flour, this finely milled Italian flour is traditionally used for making pasta, pizza dough, and pastries. Renowned for its silky texture and high gluten content, 00 flour results in a smooth, elastic dough that yields tender pasta and crispy yet chewy pizza crusts. It has a fine grind ensuring a delicate crumb in baked goods like cakes and pastries.
00 Flour means the level of grinding that has taken place in the flour milling process. A 00 flour is a finer grade of flour.
T55 Flour (French Baguettes)
T55 flour, commonly used in French baking, is similar to all-purpose flour but with a slightly higher protein content. This versatile flour strikes a balance between strength and tenderness, making it suitable for a wide range of recipes, including baguettes, crusty rolls, croissants, and other French breads and pastries.
It has a moderate gluten content and therefore a T55 flour produces bread with a light, airy texture and a golden crust. This is the type of finish which is perfect for artisan loaves and French sticks.
Plain Flour
Plain flour, which is sometimes known internationally as all-purpose flour, is a pantry staple in many households. Made from a blend of hard and soft wheat varieties, plain flour has a moderate protein content, typically ranging from 8% to 11%. Its versatility makes it suitable for various baking projects, from cakes and cookies to biscuits and pancakes.
While plain flour can be used for bread making, it may require additional gluten development for optimal results. I'd suggest sticking with plain flour for scones and also batters for items like pancakes or my toad in the hole Yorkshire pudding recipe rather than using it in breads.
Plain flour is a useful coating when doing a deep fry recipe. Have a look at my KFC Halloumi Fries recipe for an idea.
Self Raising Flour (Cakes)
Self-raising flour is a great option for recipes that require leavening agents, such as baking powder or baking soda. This flour is pre-mixed with a raising agent which helps baked goods like cakes, muffins, and scones rise during baking. Self-raising flour is commonly used in quick and easy recipes where convenience is key, eliminating the need to measure and mix leavening agents separately such as my beer bread recipe.
It is possible to make your own self raising flour by adding a teaspoon of baking powder for every 100g of plain flour.
Bread Flour
Lastly, bread flour is specifically formulated for making yeast-risen breads, such as artisan loaves, sandwich bread, and rolls. With its high protein content which normally sits around the 12% to 14%, bread flour provides the necessary strength and structure to capture carbon dioxide gas produced by yeast during bulk fermentation (otherwise known as rising). This results in a well-risen loaf with a chewy texture and a hearty crust.
Bread flour's gluten development capabilities make it ideal for shaping and scoring bread dough, allowing you to create intricate designs and patterns if you so wished.
You can also make sourdough style bread (without yeast and from a starter culture) using bread flour. The initial starter can be made using a bread flour or rye flour to help get a good gluten and protein base for your loaf.
Flour Types In Brief
In summary, the differences between 00 flour, T55 flour, plain flour, self-raising flour, and bread flour lie in their protein content, gluten strength, and intended uses. While 00 flour and T55 flour excel in Italian and French baking plus other types of European baking, plain flour offers versatility for a wide range of recipes.
Self-raising flour provides convenience for quick breads and pastries, while bread flour is the go-to choice for hearty, yeast-risen breads. Most of the recipes on my site will call for bread flour. These are available online in varying quantities from 500g up to 25Kg sacks of flour. My brand of preference is Shipton Mill. For supporters of the Real Bread Campaign please note you can get a discount at some suppliers too.
Bread Recipes From Around The World
Water For Bread Dough
While water is going to vary from place to place depending where you are in the country or even in the world, there are some constants that must be focused on when making bread. Water is one of those.
Bread Water Temperature
To make bread you need water at a temperature which will allow the yeast to activate. Most of my recipes call for luke warm water which typically means around 30C (86F). I suggest this temperature for baking as the yeast will work nicely at this ambient range. If the water is too hot then it will burn the yeast. Too cold and it will not activate.
Water hardness or Ph level will affect the taste of breads in general, however you will find that it won't be too drastic a change unless comparing like for like at the same time. Therefore I would not worry too much about the hardness of the water.
Alternatives to water
It's not essential to use water in bread. Some excellent results can be achieved by making bread with beer. I have an Estrella beer bread recipe for an excellent white loaf. For something a little more malty, try my Guinness Beer Bread recipe.
Bread Dough Hydration
The hydration of a dough determines how much water to flour ratio there is in a bread. The more the hydration increases, the dough can become lighter when baked a sit reduces in density. This however comes at a cost of how easy the dough is to work with. The wetter the dough, the more difficult it is to shape.
Don't give up with hydration though as over time you will develop techniques such as coil folding, stretch and folding and other similar techniques instead of kneading bread. However for my yeast based recipes, regular kneading of dough will be fine and a hydration level of 60% to 65% is really manageable.
My bread dough hydration calculator lets you work out how much water and flour you will need to work for a specific percentage of hydration. So simply add in the amount of flour in grams that you have, along with the hydration level you want and it will calculate the amount of water needed.
The calculator is based on standard amounts being 2% salt, 15% starter (or if using yeast change to grams - 15g per 1Kg flour) and then whatever water or flour weights are required.
Try adjusting the various weights to see the outcomes. It is always fund doing an experiment when baking so don't be afraid to try new things.
Yeast For Baking
There are two main types of yeast in baking, instant yeast (sometimes known as freeze dried yeast) and fresh bakers yeast.
Instant Yeast
This type of yeast is probably the most popular for home bakers due to the shelf life of the yeast. The yeast is a fine brown powder with a beer "yeasty" smell to it (how else to describe it??!)
Normally sold in a tin or individual 7g sachets. They come with instructions on the pack however go with the assumption of one 7g sachet per 500g of flour. If using the tinned yeast it's 1 to 1.5 teaspoons of yeast per 500g. Or you can just weigh out 7g too. Allinsons is the brand I use which comes in a bigger pot.
The bread types that instant yeast can make are so varied. These range from anything such as my double layer cinnamon swirls to a honey and oat rye loaf.
Bakers Yeast / Fresh Yeast
You know you are a home baker when you start to experiment with fresh yeast. It stinks like baby sick and you'll want to use it up quickly before your fridge smells of it too! Normally bought in blocks. A bit like you would butter that comes in foil - you cut or tear off what you need.
Double up this time (compared to instant yeast). So it's around 15g of yeast per 500g of flour for a regular loaf. The recipe you work off will have a guidance on what to use. Try making my regular white loaf and compare a loaf made with fresh yeast to one made with instant yeast. See if you can tell the difference - do the 'Pepsi challenge' on bread with friends!
Mixing the ingredients
To make bread the ingredients we talked about above need to be mixed together. This can be done by hand or with a stand mixer. The process of mixing the ingredients also involves "kneading". This means to gradually build up the gluten strength from the flour and the yeast. The more we knead the bread, the stronger the gluten build. Therefore the better the rise and the structure of the finished loaf.
Kneading bread takes time and patience. I actually find it a form of therapy and enjoy the de-stressing process of kneading dough while it forms. This task can also be done with a stand mixer with a dough hook attachment.
While both tasks achieve the same results, the time it takes to get the dough ready will be different.
- Dough kneaded by hand - around 10 to 15 minutes of kneading. Rest for a few minutes after 5 minutes.
- Dough mixed in a mixer - no more than 10 to 12 minutes on a slow to medium speed. Mix for 5 minutes, then stop for 5 minutes before continuing.
It can be easy to overwork the dough in a mixer so if starting out, try doing it all by hand at first.
Kneading Results
The end result we are looking for is a smooth dough that fights back if pushed. It should be strong and be able to sit in a soft ball. If placed on the table and it sprawls flat then it's either not kneaded enough (or over kneaded). It's really quite hard to over do it by hand however. Therefore that is why I recommend to learn by hand first.
Rising (Proving)
Once your dough is made up and kneaded then it's time to let it rise. Normally a rise of bread takes anywhere from 1 hour to 3 hours in a typical UK house with an ambient temperature of 21C. My kitchen is much warmer in summer than winter, so adjust your timings to allow for ambient temperatures.
How to know when the dough has risen?
You are looking for a dough to be just under doubled in size. Some tips to achieve this:
- Take a photo before so you have something to refer back to.
- Mark a line on the dish/pot in which it is rising in.
- Use an elastic band around the bowl where you expect double the size to be.

Shaping
You can shape bread into lots of different types of bread styles. Many breads have a unique style to them such as a farmhouse loaf or a Challah Bread. The style and shape is entirely up to you.
This part of the process happens following the initial rise. Mix, knead and rise the dough and then you are ready to shape.
Shaping the dough should never be underestimated just how important this step is. The skin of the dough needs to be tight and uniform to help get a decent rise. Under proving or over proving can cause the bread dough to tear while baking ruining your loaf. Spend time practising shaping dough and try different techniques.
Prepare The Tin
For a standard loaf tin (such as a 2lb loaf tin which is a good starting point for most breads) I'd recommend greasing the bread tin with some butter or stork margarine so that the loaf drops out easily when cooked. Rub it all around the tin inside to cover all surface.
Other tins such as Pullman bread tins or a ceramic bread baking cloche all offer different types of vessels to bake bread in.
Shape The Dough
Dust the surface with some bread flour and then stretch out the dough into a rectangle. Then fold the short lengths into the middle in thirds.
Once folded, roll from one end in and keep the outer skin as tight as possible. This will give the outer crust a complete and firm edge when baking.
Once rolled fully, place it seam side down in the bread tin. Cover with a damp cloth (or shower cap - yes you heard me right, they work a treat!) Let this prove for another 30 to 40 minutes, again more or less doubling in size and having a glossy glisten to it.
This will now be at a point where you are ready to bake.
Shaping and Proving - An Experiment
I compared two loaves of bread to see how shaping them differently in a tin would affect the outcome of the loaf. Both of these loaves have been made with the same dough. Prior to shaping it was split in half (700g in each loaf) and then placed in two separate tins.
The difference between how they were placed in the tins were as follows. On the left, the dough was squashed into the tin filling all corners. On the right, the dough was formed into an oval shape and placed in the tin gently.
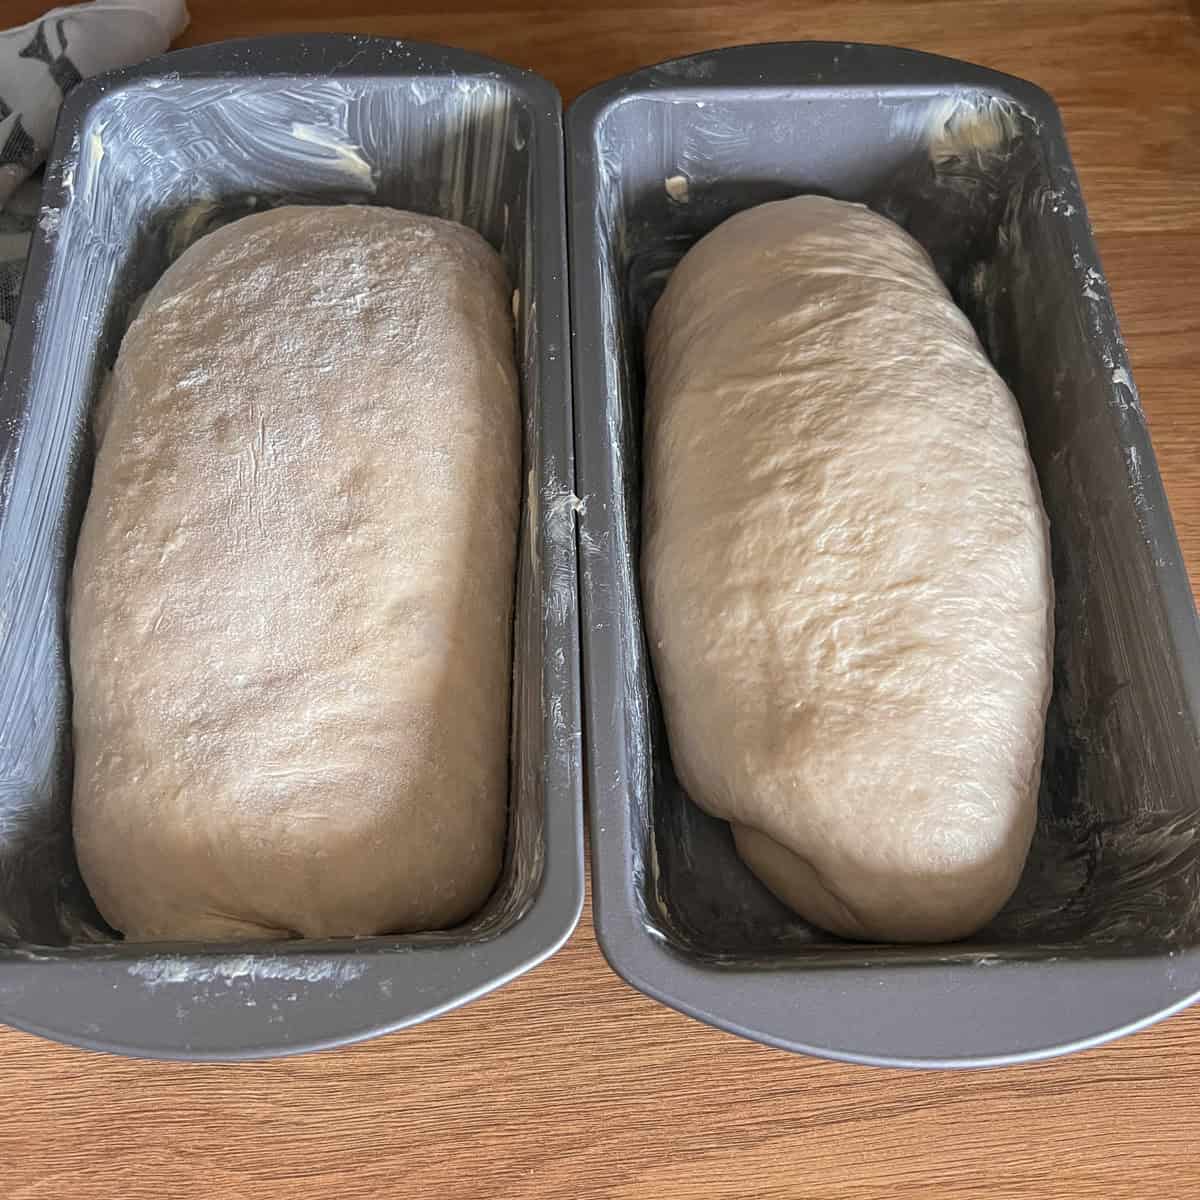
This is before the loaves had proved. So squashed on the left into all corners and the right tin was gently shaped into an oval.

After proving for 60 minutes, we can see both have risen nicely, but the left still looks more square than the right.
I guess this experiment doesn't really prove anything, but I just wanted to show that the bread can be versatile and shaping is important. Bread baked in a tin is much more forgiving than that on a stone.
Baking A Loaf Of Bread
You should set your oven to:
- 180C to 200C
- 350F to 390F
- Gas Mark 5 to 6
for at least 15 minutes. Ideally you want it to preheat for around half an hour so the heat is roaring.
Steam Oven Baking
If you have a steam oven, then make sure you have the steam setting on. This will certainly help rise the bread. If you don't have a steam oven, add a tray in the bottom of the oven and pouring in water will help create steam. Take care not to let it splash on the oven glass as that can cause shattering in some ovens.
It is possible to avoid requiring steam altogether by using a Dutch oven for baking your bread. This is a pot with a lid where you place dough in and it cooks under its own steam. Generally this is for sourdough bread baking but does work for yeast based recipes too.
Baking Time
Once ready, put the tin in the middle of the oven and make sure there is room to allow it to rise. Let it bake for at least 25 to 30 minutes. The bread will rise and rise and the top will get a beautiful brown colour to it.
After the 30 minutes, remove it from the oven and turn out onto a cooling wire rack or cooling tray. If you don't have one, you can use a cool oven shelf and place the bread directly on there.
Tap the underside of the loaf to check for a hollow sound. If it taps making a hollow sound then this means the bread is cooked right through. If not, pop it back in the oven (directly on the shelf if you want) for another five minutes at a time until cooked through.
Now this is difficult, but try to let the loaf cool down fully before cutting into it!
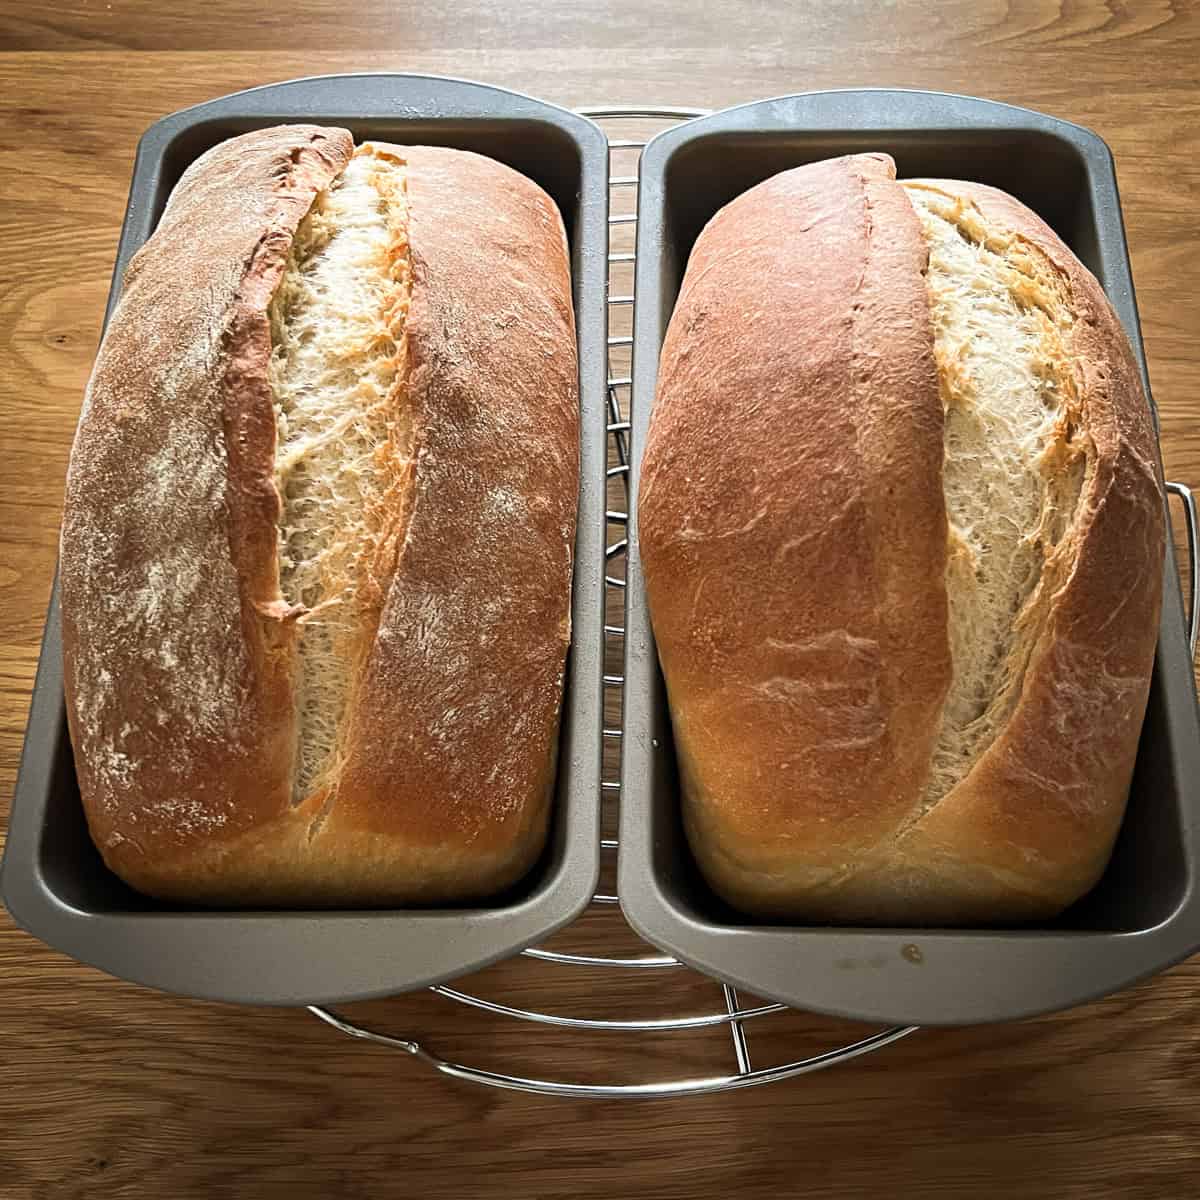
Remember those two loaves we shaped earlier on? After baking, the bread has risen nicely again and split where the score was placed prior to the bake.
As we can see from the proving experiment, the different shapes have an impact on the outcome, but both still look and taste great.
Checking Bread Is Cooked
To make sure your bread is done, tap the underneath of it and listen for a hollow sound. If a hollow tapping sound is made then it's done. If the sound is a bit of a dull thud, pop it back in the oven for another 5 minutes.
Storing Bread
There are plenty of options to making bread last however my preferred method it to freeze once cooled.
I prefer to slice the bread and then separate off in to freezer bags a half loaf at a time. Then when needed, I lift out a half loaf from the freezer and this gives me 6 to 8 slices which is enough for that day.

The bread should be cut into slices using a bread knife. Aim for 1cm to 1.5cm slices for using day to day.
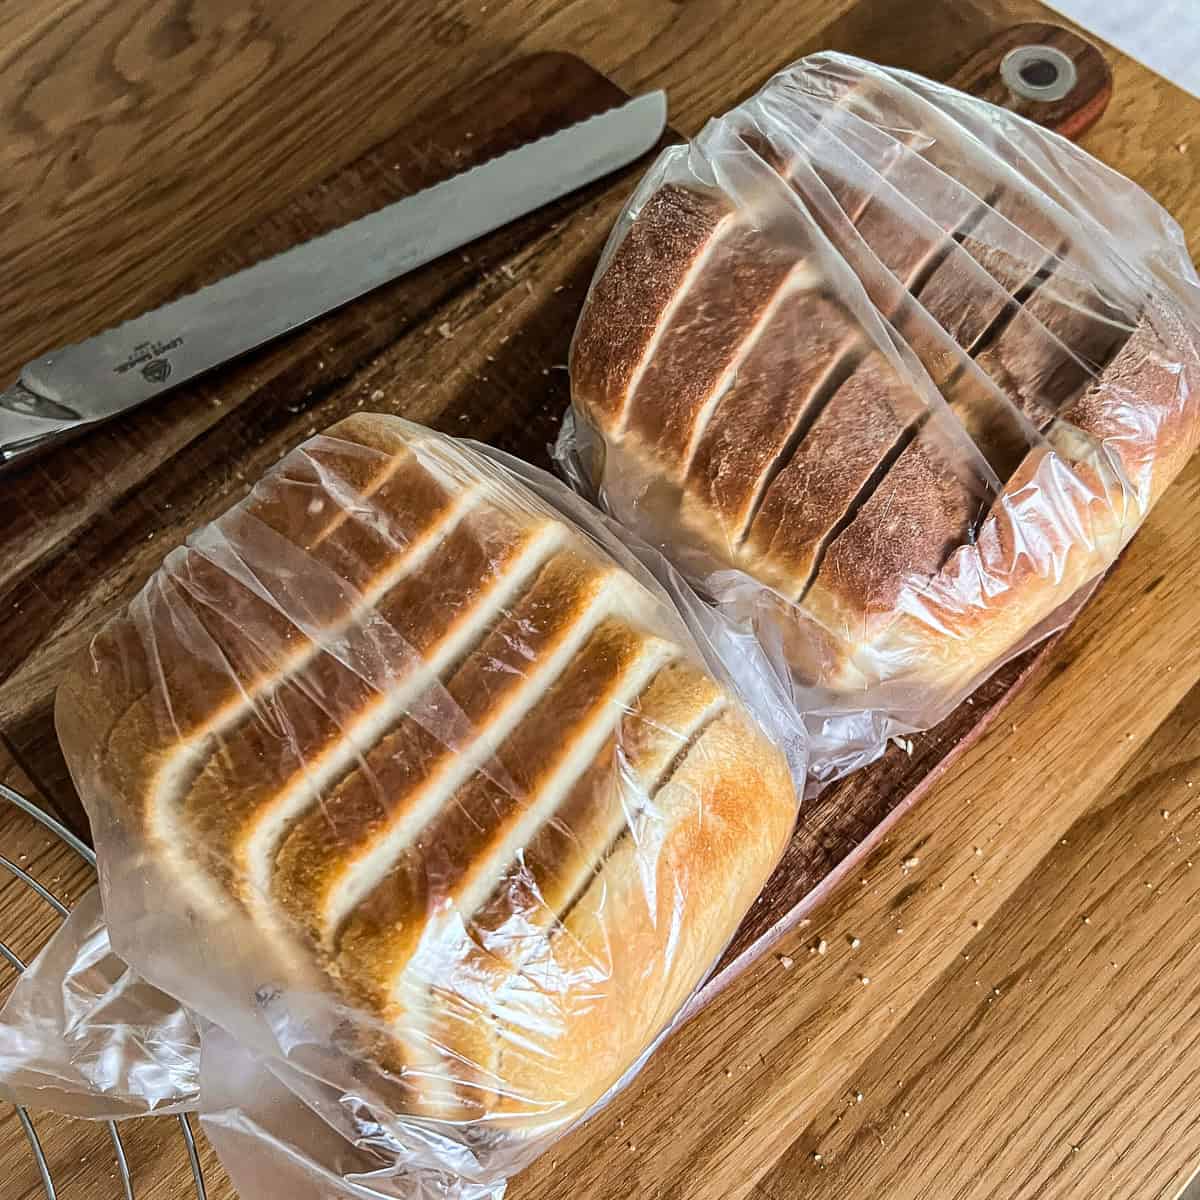
Bagging the sliced bread into sandwich bags makes storing much easier. These can then be frozen.
Toppings & Bread Dips
There are lots of bread dipping oils that can be bought to enjoy a loaf without needing butter. I like to add some balsamic vinaigrette to some olive oil and enjoy a dip. Adding some herbs from your collection will give some additional flavour too.
Conclusion
Congratulations, you know how to make a loaf of bread from start to finish. This is a skill which can become an addiction if you want it to! Happy baking and as always, reach out for any help or advice. Let me know how you get on with your baking adventures too!
More posts like this


2 responses to “How Is Bread Made? A Comprehensive Guide To Breadmaking”
-

This guide covers it all. Thanks for putting it together!
-
Thank you Barry. If there is anything you are not sure about, just ask. Happy to help.
-


Leave a Reply