


Affiliate Disclosure As an Amazon Associate I earn from qualifying purchases. This post may contain affiliate links. For more details, refer to my Disclaimer page.
A sourdough starter is a simple mix of flour and water that ferments over several days to capture the wild yeast and bacteria naturally present in your kitchen. Once active, it works as a natural raising agent in place of regular shop bought or commercial yeast, giving sourdough bread its tangy flavour and chewy texture. Making one from scratch takes around five to seven days, costs very little and needs nothing more than flour, water, a jar and a bit of patience.
This guide covers everything you need to make your own starter at home: what goes into it, how to feed and maintain it, where to store it, how to fix the common problems that catch people out, and how to bake your first loaf once the starter is ready.
Contents
Before We Begin
Making a starter from scratch takes the best part of a week before it is ready to bake with. If you would prefer to get going sooner, you can buy a ready-made starter instead. I bought and reviewed a 150-year-old San Francisco sourdough starter, and you can read how it performed in my San Francisco sourdough starter review. The rest of this guide is for anyone who wants to make their own from scratch.
There are three simple ingredients when it comes to making a loaf of sourdough bread which are:
- Flour
- Water
- Salt
However there are two more ingredients people rarely list but without them, you will NEVER make a successful loaf of sourdough. These key ingredients are:
- Time
- Patience
I can guarantee that if you do not have time and patience, you will get frustrated and making the bread will not work for you.
If you want an easier challenge to start with? I suggest you check out my 'How is Bread Made' guide which covers all the basics. There are yeast based recipes which are a great starting point for beginners.
Trust me with this one, a little time and patience goes a long way and it may take a few attempts before you get a successful loaf but when you do, it is certainly worth it. Happy to keep going? Then read on...
Why Make Sourdough Bread?
Sourdough bread has gained immense popularity in recent years, with its tangy flavour, chewy texture, and undeniable appeal. But you might be wondering, why make sourdough on a budget? Well, there are several good reasons to consider why it's become a national hobby.
When you make sourdough bread at home, you have complete control over the ingredients used and the entire baking process. This allows you to enjoy a wide range of benefits, including:
- Healthier Option: Homemade sourdough bread is often more nutritious compared to store-bought alternatives. The natural fermentation process in sourdough enhances digestion, increases nutrient availability, and reduces the glycaemic index of the bread.
- Customisation: By making your own sourdough, you can experiment with different flours, add-ins, and flavours. Whether you prefer a classic country-style loaf or a more adventurous combination, the possibilities are endless.
- Taste and Texture: Sourdough bread has a distinctive taste and texture that is hard to replicate with regular yeast. The long fermentation process results in a complex flavours profile, with a tanginess that adds depth to every bite. Additionally, sourdough bread tends to have a chewier crust and a softer, more open crumb.
- Cost Savings: By making sourdough at home, you can significantly cut down on your bread expenses. Commercial sourdough loaves can be pricey, especially if you prefer artisanal or organic options. With homemade sourdough, you'll save money while enjoying the same delicious bread.
Sourdough On A Budget Can Save You Money
Contrary to popular belief, making sourdough doesn't have to be an expensive endeavour. In fact, it can actually save you money in the long run. Here's how:
- Starter Culture: Creating and maintaining a sourdough starter is inexpensive. All you need is flour, water, and a bit of time and patience. Once established, your starter can be continuously refreshed, providing you with endless batches of sourdough bread without additional costs. It will need to be maintained but once this becomes a part of your routine then it will be no bother.
- Bulk Buying: Purchasing ingredients in bulk can significantly reduce costs. Buy larger quantities of flour, whole grains, and other baking supplies to save money in the long term. As you bake more, you'll notice that the cost per loaf decreases. There are plenty of online retails who will deliver sacks of flour. Try Shipton Mill in the first instance as a good place to start. Also, if you are a supporter of the Real Bread Campaign then you can get discounts on certain suppliers too.
- Versatility of Sourdough: This can be used for more than just bread. You can make pancakes, waffles, pizza dough, and other baked goods using these sourdough starter recipes. This versatility allows you to replace store-bought alternatives, saving money on multiple fronts.

Overcoming the Myth of Expensive Ingredients
Many people believe that making sourdough requires expensive specialty ingredients. However, this is just a myth. In reality, the main ingredients for sourdough bread are fairly simple and budget-friendly:
- Flour: The backbone of any sourdough starter is flour, which is readily available and affordable. Opting for quality flours, such as bread flour or whole wheat flour enables you to enhance the flavour and texture of your bread.
- Water: Tap water works perfectly fine for sourdough bread. There's no need to invest in fancy mineral water or filtered options.
- Salt: Basic table salt is sufficient for most sourdough recipes. No need for expensive gourmet salts or specialty varieties.
- Time: The natural fermentation process of sourdough requires time, but time is free! It's simply a matter of planning and patience.
By debunking the myth of expensive ingredients, you can confidently embark on your sourdough journey without breaking the bank.
Now that you understand the benefits of making sourdough on a budget, let's explore some wallet-friendly recipes for homemade sourdough starter in the next section.
How To Make A Homemade Sourdough Starter
Creating your own homemade starter is not only a rewarding experience but also a great way to save some money while enjoying the delicious flavours of sourdough bread. In this section, I will give you the steps to create your own starter.
What is a Sourdough Starter?
A sourdough starter is a natural leavening agent made from a mixture of flour and water that captures wild yeasts and beneficial bacteria present in the environment. These microorganisms help ferment the dough, giving sourdough bread its distinct flavour and texture.
Unlike commercial yeast, which provides a quick rise, a sourdough starter requires time and patience. However, the extra effort is well worth it, as sourdough bread made with a homemade starter boasts a unique tangy taste and a delightful chewy texture.
Sourdough Starter Recipe
This recipe for creating your own sourdough starter is surprisingly simple. Follow these steps to get started:
- Mixing the ingredients: In a clean glass jar or container, combine equal parts of flour and water. For example, you can start with ½ cup of flour and ½ cup of water. Stir well until no dry flour remains. You can use whole wheat, rye, or all-purpose flour for your starter.
- Feeding the starter: Every 24 hours, discard about half of the starter and then add equal amounts of flour and water. This process is known as "feeding" the starter and helps promote the growth of wild yeasts and bacteria. Continue this daily feeding routine for about 5-7 days, or until the starter becomes bubbly and active.
- Monitoring the progress: As you feed the starter, observe its activity level. Look for bubbles forming on the surface and signs of fermentation, such as a slightly sour smell. This indicates that the wild yeasts and bacteria are working their magic within the mixture.
- If all else fails: If you don't want to make your own, get a ready made sourdough starter online.
Tips for Maintaining and Feeding Your Starter
To keep your sourdough starter happy and healthy, consider the following tips:
- Maintaining consistency: Once your starter becomes active, you can maintain it by refrigerating it and feeding it once a week. This slows down the fermentation process and allows you to have a ready-to-use starter whenever needed.
- Feeding ratios: When feeding your starter, it's essential to maintain the right balance of flour and water. A 1:1 ratio (equal amounts of flour and water by weight) is a commonly used feeding ratio, but you can adjust it based on your preferences and the consistency of your starter. For a strong starter I recommend 1:5:5 which is 1 part (existing) starter, 5 parts water and 5 parts flour. An example of this would be 10g of discard (original starter), 50g water, 50g flour.
- Using a kitchen scale: To ensure accuracy and consistency in feeding your starter, it's helpful to use digital kitchen scales to measure the flour and water by weight rather than volume. This method provides more precise measurements, leading to better results.
- Experimenting with different flours: While all-purpose flour is commonly used for creating a sourdough starter, you can experiment with different types of flours like whole wheat or rye to add unique flavours and characteristics to your starter.

By following these simple steps and tips, you'll be well on your way to creating a thriving sourdough starter that will serve as the foundation for your wallet-friendly homemade sourdough bread recipes.
Storing Sourdough Starter
There are plenty of places that a starter will live and thrive very happily, whether this be in your fridge or out on the top. A standard Kilner jar or glass jar will work well. Something where you can see in and view how quick the starter is rising up. This is especially important when feeding time comes. Knowing how much to feed and how quickly the starter doubles in size is key to getting the optimum rise from your dough.
A glass or plastic jar or bowl is a perfect container to store a starter in. While it doesn't need to be air tight, it needs to have a lid if being left out on the top to avoid any nasties getting into it.
Avoid storing sourdough starters in metal containers, or stirring with metallic objects. They can react to the metals and is generally advised to avoid this.
Rising Times for Starters
How long a sourdough starter takes to rise depends mostly on how warm your kitchen is. The warmer it sits, the faster the wild yeast works, and the sooner the starter doubles in size. The chart below gives a rough guide to rise times across the kind of temperatures you find in a typical UK kitchen through the year.
This also applies to the general climate of the country you are in. Here in the UK, I can guarantee that I will need longer in the winter months to allow my sourdough starter to rise that I will need in the summer months. I may consider using a sourdough blanket or a form of heat mat to keep it warmer if it's really cold.
Sourdough Starter Temperature Chart
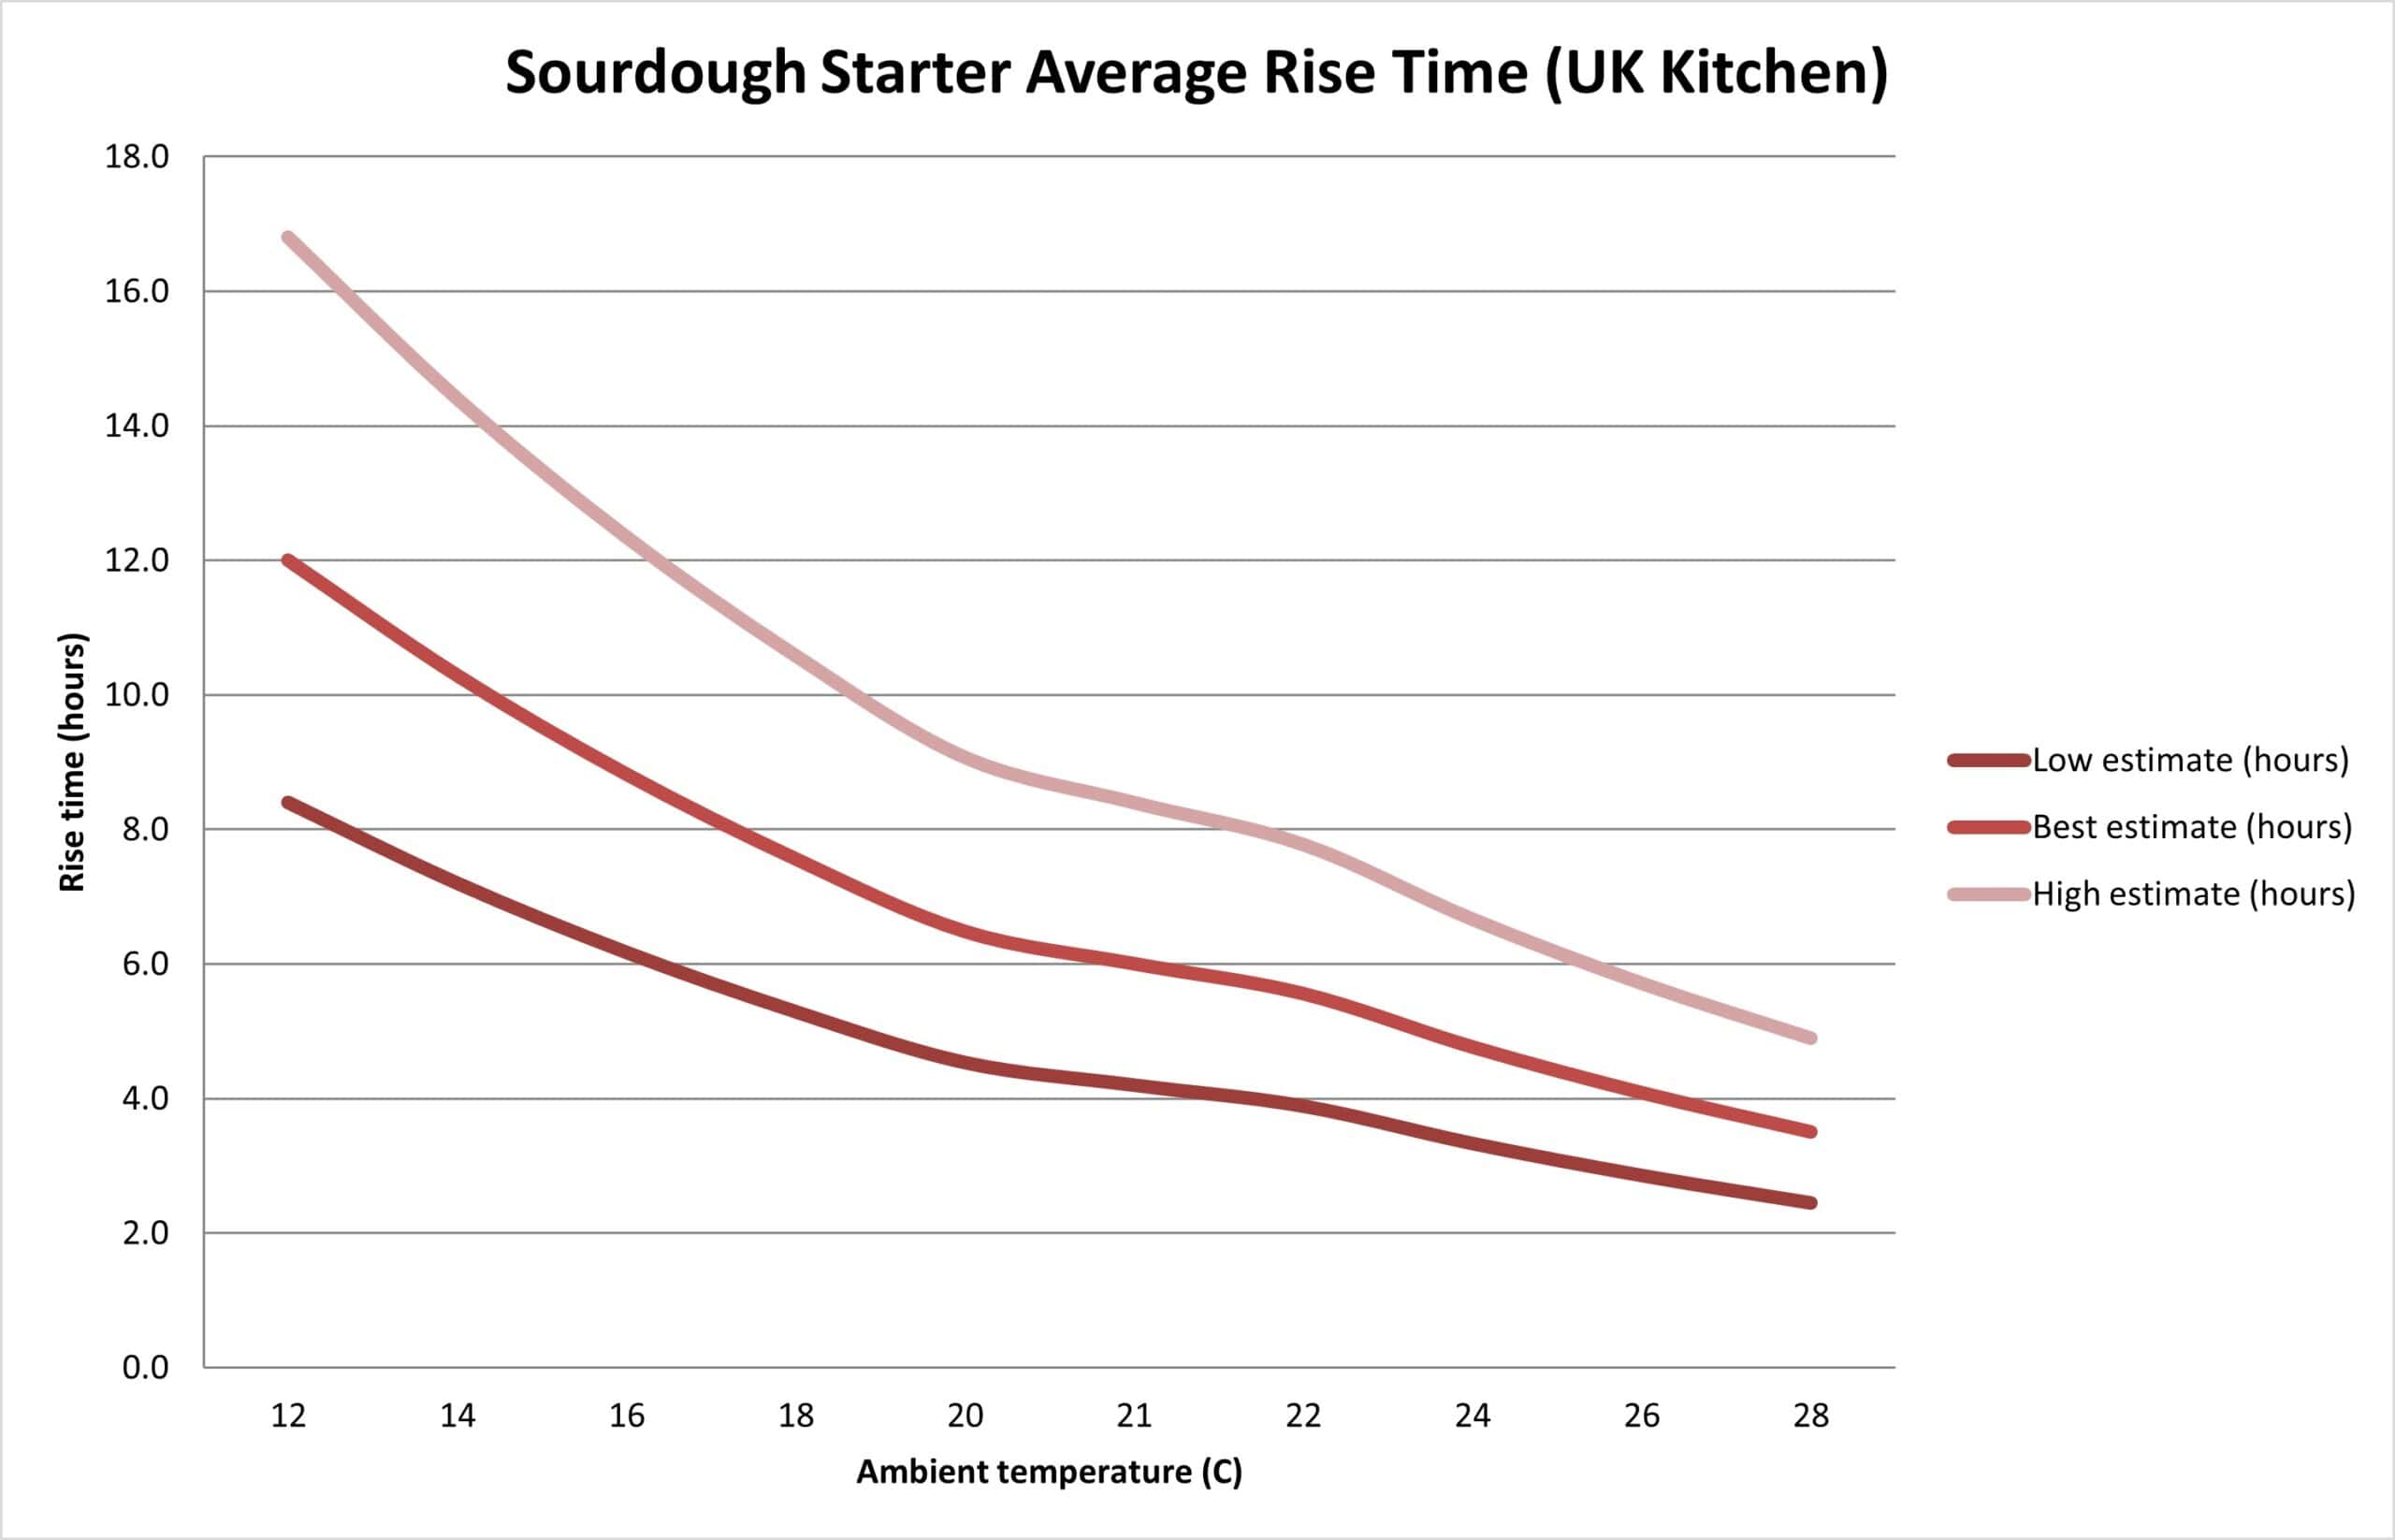
A few things are worth knowing before you read too much into the numbers.
These are estimates, not stopwatch readings. Rise time is affected by more than temperature alone. The age and health of your starter, the flour you feed it, the feed ratio and the hydration all play a part. The chart assumes a healthy, established starter fed at a 1:1:1 ratio by weight, which is equal parts starter, flour and water, using strong white bread flour. A young starter in its first couple of weeks will be slower and less predictable than the chart suggests.
Rise time here means the time from feeding to the starter roughly doubling in size. That is the point at which it is at its most active and ready to use in a dough.
The relationship is not a straight line. Fermentation speeds up sharply as it gets warmer, so the difference between 12C and 16C is far greater than the difference between 24C and 28C. This is why a starter can feel sluggish all through a cold UK winter and then race away in a warm summer kitchen.
The fridge is a separate case. At fridge temperature, around 4C, a starter is effectively paused. That is why the chart starts at 12C. If you keep your starter in the fridge between bakes, you can leave it one to two weeks between feeds rather than the daily routine an active starter needs at room temperature. See the storing section above for more on this.
The most accurate chart is the one you make yourself. Every kitchen and every starter is slightly different. If you want figures you can truly rely on, keep a simple log then each time you feed your starter, note the room temperature and how long it takes to double. After a dozen or so feeds across different times of year, you will have a rise time guide built around your own starter and your own home, which is far more useful than any general chart.
Other methods you could use to warm up a starter:
- Oven with the light on - don't switch the heat on the oven, but the light bulb gives off heat.
- On a radiator - Care should be taken with this that it doesn't get too hot, but a warm area of a room will help.
- On top of the tropical fish tank - My fish tank has water at 24C and so the top of the tank can be a good place to sit the starter to keep it a bit warmer than the rest of the house.
If it's the opposite and you need to keep the starter cool, then you can try some of the following locations:
- In the fridge - A fridge will keep a sourdough starter cool but it may not rise at all for a few days if too cold.
- Near the air conditioning unit - Make sure you face it to the cold air, not the warm pipe kicking out the heat at the back.
- In the garage or cellar - A cooler part of the house which gets less sun will work well too.
Troubleshooting a sourdough starter
This is normal in the first few days and usually means the starter needs more time and a little more warmth.
Wild yeast takes time to establish. A starter often shows little activity on days one and two, picks up, then slows again around day three or four before getting going properly. Keep feeding it once every 24 hours. If your kitchen is cold, move the jar somewhere warmer, as anything around 21C to 25C is ideal. A starter in a cold UK kitchen in winter can take several days longer than the same starter would in summer. If there is still no activity after seven to ten days of consistent feeding, it is worth starting again with fresh flour and water.
It has most likely run out of food and needs feeding sooner.
An active starter doubles in size, peaks, then sinks back down as the yeast uses up the available flour. If it collapses and goes quiet, that is the sign it needs feeding. Once a starter is established and rising predictably, feed it when it reaches its peak rather than waiting for a set time on the clock.
This liquid is called hooch and it is harmless. It means the starter is hungry.
Hooch is a thin liquid, usually grey or brown, that forms when a starter has gone too long between feeds. You can either pour it off or stir it back in. Stirring it in gives a slightly tangier result. Either way, feed the starter afterwards and consider feeding it a little more often.
A sharp, acetone-like smell means the starter is under-fed, not spoiled.
A healthy starter smells pleasantly sour, a little like natural yoghurt or beer. A harsh smell of nail polish, vinegar or alcohol means the yeast and bacteria have used up everything available and the mixture has turned acidic. It is still safe to keep. Feed it once or twice over the next day or two and the smell should settle back to a milder sour.
Throw the starter away if you see fuzzy mould or any pink or orange streaks.
Genuine spoilage is rare, but it is clear when it happens. Mould looks fuzzy and can be white, green, black or grey, often appearing as spots on the surface or around the rim of the jar. Pink or orange streaks point to unwanted bacteria. In either case, do not try to save it. Discard the whole starter, wash the jar thoroughly and begin again. A normal sour smell, hooch and a greyish colour are not signs of spoilage.
Adjust the texture at the next feed by changing the amount of water slightly.
A starter should have the consistency of a thick batter. If it is stiff and hard to stir, add a little more water at the next feed. If it is runny, add a touch more flour. Small adjustments work better than large ones. Different flours absorb water differently, so wholemeal and rye starters often need a little more water than white.
Cold is the usual cause, so find it a warmer spot.
Temperature affects a starter more than almost anything else. In a cool UK home, especially over winter, a starter can take far longer to double. Useful warm spots include an oven with only the light switched on, the top of the fridge, or near a radiator with care taken that it does not get too hot. For more on this, see my guide on how to keep a sourdough starter warm and the temperature chart in the storing section below.
Using your Sourdough Starter
If you're on a budget but still want to enjoy the deliciousness of homemade sourdough, you've come to the right place. In this section, we'll explore wallet-friendly sourdough recipes that will satisfy your taste buds and keep your wallet happy. From a simple sourdough bread recipe to creative ways of using your sourdough starter, I've got you covered.
A Simple Sourdough Bread Recipe
Making your own sourdough bread doesn't have to be complicated or expensive. With just a few basic ingredients, you can create a flavourful loaf of sourdough bread right in your own kitchen. Here's a simple recipe to get you started:
Sourdough Bread Ingredients
- 500 grams of bread flour
- 325 to 350 millilitres of water
- 100 grams of sourdough starter
- 10 grams of salt
Sourdough Bread Instructions
- In a large mixing bowl, combine the bread flour, water, and sourdough starter. Mix well until all the ingredients are fully incorporated.
- Add the salt and knead the dough for about 10 to 15 minutes until it becomes smooth and elastic. If you don't want to knead, you can use the stretch and fold method which is pulling the dough up and tucking in to the middle, then turning the bowl 90 degrees and repeating until you've done about 8 stretch and folds. Repeat this process every 30 minutes for 2 hours.
- Cover the bowl with a clean kitchen towel and let the dough rest for about 3-6 hours, or until it has more or less doubled in size. You are looking for a nice jiggle when you gently shake the bowl - there may be some bubbles starting to appear under the surface too. This is a crucial point in sourdough baking and where patience comes in. It could be longer if the ambient room temperature is cooler.
- Once the dough has risen, carefully transfer it to a lightly floured surface and shape it into a round loaf. Shaping requires care and you are looking for a smooth but tight skin.
- Place the shaped dough into a banneton dish, cover with a cloth or shower cap and cold prove in the fridge over night (or for at least 12 hours). 24 to 48 hours will give you even more of a "tang".
- Preheat your oven to 220°C (450°F) and place a Dutch oven or a baking dish with a lid inside to preheat as well. Preheat for at least 20 minutes.
- Place the proved dough into the preheated Dutch oven or baking dish, cover with the lid, and bake for 30 minutes.
- After 30 minutes, remove the lid and continue baking for an additional 15-20 minutes, or until the bread is golden brown.
- Once baked, remove the bread from the oven and let it cool on a wire rack before slicing and enjoying.
- Don't be disheartened if your loaf comes up gummy or burnt. It takes time and patience and this is the fun of sourdough baking. Your first loaf is rarely perfect. Feel free to contact me if you need help with the process.
This simple sourdough bread recipe requires minimal ingredients and equipment, making it an affordable option for anyone looking to bake their own sourdough. Check out my other sourdough posts to add flavours to your bread.

Sourdough Discard
When maintaining a sourdough starter, you often end up with excess discard that needs to be used or discarded. Luckily, there are plenty of budget-friendly sourdough starter recipes that make use of sourdough discard.
Sourdough Discard Ideas
Creative Ways to Use Discard
Beyond bread and discard recipes, starter discard can also be a versatile ingredient in everyday cooking. Here are some creative ways to incorporate it into your meals:
- Sourdough Pancake Syrup: Combine sourdough starter with sweeteners like maple syrup or honey to create a tangy and unique pancake syrup.
- Sourdough Dressing: Use your sourdough starter to make a flavourful dressing for salads or as a marinade for meats and vegetables.
- Sourdough Fried Chicken: Add sourdough starter to your fried chicken batter for extra flavour and a crispy texture.
- Sourdough Pizza Sauce: Mix sourdough starter with tomato sauce, herbs, and spices to create a tangy pizza sauce with a twist.
- Herby Sourdough - Mix in some herbs from the garden to add some zing.
- Sourdough Chocolate Cake: Surprise your taste buds with a rich and moist chocolate cake made with the addition of sourdough starter.
By thinking creatively, you can find numerous ways to incorporate your starter into your everyday cooking, adding a unique and delicious twist to your meals.
Money-Saving Tips for Sourdough Baking
I get that baking is not always the most cost effective way of acquiring bread due to rising electricity costs and ingredient cost, but if you are passionate about baking sourdough but there are ways to save. From ingredient substitutions to utilising every bit of your sourdough starter, I've got you covered.
Thrifty Ingredient Substitutions
When it comes to sourdough, some ingredients can be quite costly. However, there are several thrifty ingredient substitutions you can make without compromising the quality or taste of your homemade sourdough.
- Plain flour (or All-Purpose Flour): Instead of using specialty flours like bread flour or high-protein flour, you can opt for more affordable all-purpose flour. It works well in most sourdough recipes and is readily available in shops.
- Whole Wheat Flour: Mixing in whole wheat flour can add depth and flavour to your sourdough loaves. Look for sales or consider purchasing in bulk to save money in the long run.
- Honey or Maple Syrup: Instead of using expensive natural sweeteners, try substituting with honey or maple syrup. These options still provide a touch of sweetness without straining your budget.
Budget-Friendly Tools and Equipment for Sourdough Baking
While it's tempting to splurge on fancy tools and equipment for sourdough baking, it's not necessary to achieve excellent results. Here are some budget-friendly alternatives that will serve you well:
- Dutch Oven Alternatives: Instead of investing in an expensive Dutch oven, use a heavy-bottomed pot with a well-fitting lid. It will create a similar baking environment and help you achieve a crusty, well-risen loaf. There are some fantastic tools here at Pro Cook.
- Kitchen Scales: Accurate measurements are crucial in sourdough baking. While electronic kitchen scales can be pricey, you can find affordable manual scales that provide accurate readings without straining your wallet.
- Basic Baking Tools: You don't need a fully stocked kitchen to bake sourdough bread. Essential tools like mixing bowls, a dough scraper, a wire cooling rack, and a bread lamé can be found at affordable prices in most stores. There are these banneton proofing kits which contain all the necessary items.
Budget baking tips
- Try timing a bake to ensure when you need to put the bread in the oven, it is just before or after you are cooking dinner or tea. That way you are using a preheated oven which was going to be on anyway.
- Place your baking stone in the oven at the time of cooking other meals, so it is pre-heated ready to use.
- Once baked, allow the bread to cool and then slice and freeze. This will reduce food wastage.
By implementing these money-saving tips, you can enjoy the wonderful world of sourdough baking without worrying too much about your budget.
Wrapping up
In conclusion, making a homemade sourdough starter doesn't have to break the bank. With these wallet-friendly recipes, you can enjoy the delicious taste and health benefits of sourdough bread without spending a fortune. By using simple ingredients and following the step-by-step instructions, you can easily create a thriving starter that will provide you with endless batches of tangy and flavourful bread. So why not give it a try? Start your sourdough journey today and enjoy the satisfaction of baking your own bread while (possibly) saving money in the process. Happy baking!
More posts like this


One response to “How to Make a Sourdough Starter”
-

Some top tips in in this guide worth checking out. Thanks!

Leave a Reply